|
TIME:
About 2 days
COST: About $300
Materials
- Lumber
- 4-by-4s:
four 8-foot lengths
- 2-by-4s:
one 8-foot length, four 10-foot lengths
- 1-by-1s:
eight 8-foot lengths (or rip down from two 8-foot lengths of 1-by-6)
- 2-by-6s:
eight 8-foot lengths, two 10-foot lengths
- Two 2- by
8-foot redwood lattice panels
- 31/2-inch
deck screws
- 2-inch galvanized
finishing nails
- Six 2-by-4
joist hangers (with nails)
- 6 feet of
undermount deck fastening brackets
- 30 11/4-inch
deck screws (for seat)
- A dozen 21/2-inch
screws
- Eight 51/2-
by 3/8-inch carriage bolts
- Eight 3/8-inch
washers
- 16 3/8-inch
nuts
- Sandpaper
- Clear wood
sealer
- Cotton rags
- 16 1-inch
copper-pipe end caps
 Tools Tools
Most of the project requires basic woodworking tools--a circular
saw, a saber saw, an electric drill, a hammer, and a nail set. You'll
need to rip a few boards into smaller sizes; you can use a table
saw or ask the lumberyard to do it. You'll also need:
- Tape measure
- Pencil
- Combination
square
- Compass
- C-clamps
or adjustable clamps
- Framing square
- 15/16-inch
paddle bit
- Extra-long
1/2-inch drill bit
- Socket wrench
set
- Ladder
- A small pump
sprayer (about $10) to apply wood sealer (optional)
- Pipe clamps
 Directions Directions
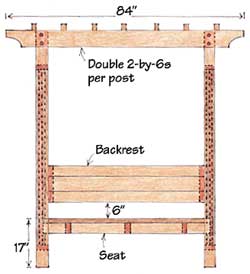
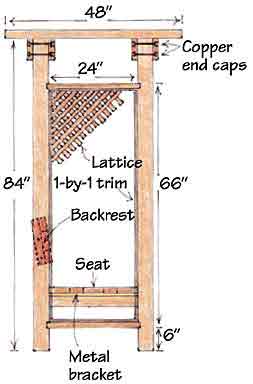
The arbor bench has four main sections: the two sides, the bench
seat, and the backrest. Build it in the sequence that follows, allowing
for the inevitable variation in the thickness of the lumber and
lattice, which will affect widths and lengths. The trellis top,
which consists of two pairs of horizontal 2-by-6s and seven 2-by-3
crosspieces, is added piece by piece. Before starting construction,
rip four of the 8-foot 2-by-6s in half (to create 2-by-3s).
Assembling
the side sections
1. Cut the
4-by-4s 84 inches long. To avoid splintering, bevel the bottom
edges of each post.
2. Divide
the posts into pairs and mark them (A and B, C and D). Lay each
pair side by side on a flat work surface. Measuring from the bottom
end, mark points at 6, 71/2, 701/2, and 72 inches. Using a pencil
and combination square, draw lines at these points across the
width of the posts. Set blade of circular saw to extend 1/4 inch
and make multiple passes to remove the wood between the pairs
of lines, creating grooves.
3. Measure
actual width of lattice panels, add 1/2 inch to that dimension,
then cut four 2-by-4 crosspieces to that size.
4. Turn pairs
of posts so grooves face each other, place crosspieces in grooves,
check squareness, and secure with two angled 31/2-inch deck screws.
5. Cut both
lattice panels to fit between crosspieces, approximately 63 inches
long.
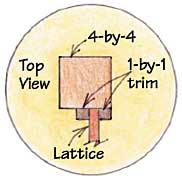
6. Each lattice
panel will be sandwiched between 1-by-1s mounted to the posts
and crosspieces. Create the outer layer by cutting 1-by-1s to
fit between posts and nail them to crosspieces flush to their
outside edges. Cut and nail 1-by-1s to fit vertically between
crosspieces. Place outer side face down on work surface. Insert
lattice panel, then hold in place with 1-by-1s at top and bottom.
7. To complete
sandwich, mark a point 17 inches from the bottom of each post.
Measure, cut, and nail lengths of 1-by-1 that extend from the
top crosspiece down to this point on either side of the lattice.
(After seat is in place, cut and nail 1-by-1 to fit between seat
and bottom crosspiece.)

The bench seat
The seat pieces
are attached to a 5-foot-long ladder-like frame, which is held in
place by deck screws that run through the frame and into the four
posts. To make a snug fit, measure the distance between the posts
and build the bench frame to that depth.
1. Equally
space three 2-by-4 crosspieces between two 5-foot-long 2-by-4s
and secure with joist hangers and nails.
2. Add undermount
deck fastening brackets to top of each crosspiece.
3. Cut one
10-foot-long 2-by-4 and two 10-foot 2-by-6s into 5-foot lengths.
Place on a work surface, alternating three 2-by-6s (save the fourth
2-by-6 for the back) with the two 2-by-4s. Position frame on top
so the outer 2-by-6s are flush with the edge of the frame, equally
space middle boards, and attach with 11/4-inch deck screws.
4. Stand the
side panels on their back edges and slip in the bench so its top
butts against the 1-by-1s on the inside faces of the posts. Check
for squareness and drive two 31/2-inch deck screws through bench
frame into each post.
The back
Slightly shorter
than the bench, the back fits snugly between the two back posts.
The actual size is determined after the bench seat is in place.
The back is held together by screws running through a 12-inch 2-by-2
(ripped from a scrap of 2-by-4) at each end of its three boards.
1. After checking
for squareness of the assembled sides and bench sections, measure
the distance between the two rear posts. Cut two 2-by-4s and one
2-by-6 to this size.
2. Space the
boards 1/8 inch apart, with ends flush. Overlay and attach the
2-by-2s, flush to the ends, with 21/2-inch screws. (Predrilling
holes will avoid splitting the wood.) Round outside corners.
3. Stand the
bench upright and recheck for squareness. Slip the back in place
so the bottom board is 6 inches above the seat and the 2-by-2
backer boards are centered on the posts. Tack loosely in place
with one screw through each 2-by-2 backer. Angle the back so it
feels comfortable to lean against, then add another screw through
each side. Set the screws firmly.
Adding the trellis
The top of the
bench has two pairs of 2-by-6 beams connecting the posts and attached
with countersunk carriage bolts. Seven 2-by-3s are spaced across
the top.
1. Cut four
7-foot-long 2-by-6s. Using the compass, draw identical curving
cutouts at the ends of each beam. Make cutouts with saber saw.
2. Lay the
arbor bench on its back. Clamp a pair of the beams to the front
and back of the front posts so they're flush with the tops and
extend equally on each side. Find center line of posts, transfer
to top 2-by-6, and mark points 1 inch from top and bottom edges.
3. Drilling
the holes through the beams and posts is the trickiest part of
the whole project. When doing this step, it's important to keep
the drill perpendicular to the work surface. Use a square as a
guide. Start drilling with the 15/16-inch paddle bit and make
a 3/4-inch-deep hole at each of the four marked points. Switch
to the long 1/2-inch bit and continue drilling through the top
2-by-6, the post, and almost through the bottom 2-by-6. Stop when
bit begins to break through. Remove clamps and bottom 2-by-6.
Switch back to a 15/16-inch bit and drill back into board (using
break-through hole as a guide), making a 3/4-inch-deep hole.
4. Reposition
and clamp boards, aligning them over the holes. Slip the carriage
bolts through all the boards, add washers and double nuts, then
tighten firmly with socket wrench.
5. Flip arbor
bench on front face; repeat steps 2 through 4 for rear set of
posts.
6. Cut seven
48-inch-long 2-by-3s.
7. While bench
is still on its front, find center of beams and mark points, evenly
spaced (approximately 9 inches apart), for the 2-by-3s.
8. Stand arbor
upright. Place 2-by-3s at points marked so they extend equally
to front and back. Secure with 31/2-inch deck screws.
Finishing touches
Sand all the
wood surfaces except lattice. Transport structure to outside location
(two strong people can do this, but three are better). Using a small
pump sprayer--a life-saver with all that lattice--apply clear sealer
to all surfaces. Wipe off excess sealer with cotton rags. When dry,
apply second coat, following directions. The last step is to insert
the copper-pipe end caps in the holes for the countersunk bolts.
Depending on the fit, you may have to hammer or glue them in position.
plans
courtesy of: WoodWorkersWorkShop.com
|


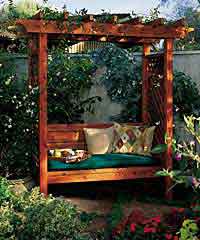 You
can add a little romance to your garden with this handsome arbor
bench. The freestanding 60-inch-wide, 30-inch-deep, 86-inch-high
structure has a number of subtle features that add to its appearance,
strength, and comfort.
You
can add a little romance to your garden with this handsome arbor
bench. The freestanding 60-inch-wide, 30-inch-deep, 86-inch-high
structure has a number of subtle features that add to its appearance,
strength, and comfort.