|
Tools and
Materials
Tools Required
- Pencil
- Try square
or combination square
- Hand saw
- 3/8"
forster bit, file
- Clean cloths
- High-quality
brush
- 120 and 150
grit sandpaper
- Two-sided
tape
Materials
Required
- Two pieces
of wood approximately 5/8" x 6" x 6" ea (oak, walnut,
cherry or maple are preferred)
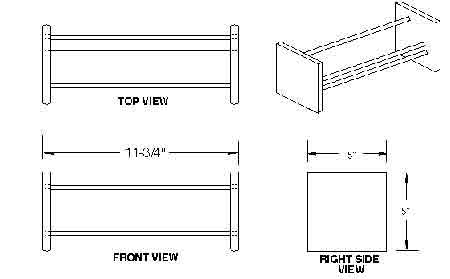
- Three 11-3/4"
pieces of 3/8" hardwood dowel rod (species should match the
other pieces of wood)
Finishing Products (Choose one)
- Oil-based:
Minwax® Wood Finish™ and Minwax® Fast-Drying Polyurethane
- Water-based:
Minwax Accents® and Minwax® Polycrylic® Protective
Finish
Optional
Items
- Band saw
or table saw
- Router table
with 1/4" roundover bit
- 80 grit sandpaper
- Minwax®
Pre-Stain Wood Conditioner
- Water-filled
metal container with cover
Procedure
I. Shaping Stock
Acquire two
pieces of wood (approximately 5/8" x 6" x 6").
In pencil, draw a square measuring 5" x 5" on both pieces
of wood (use one existing corner, if possible).
Cut both pieces to the lines that you drew. (Both pieces should
be the same size.)
II. Drilling
Holes
Lay out holes
for dowel rods on one face of one board (see Assembly Diagrams).
Tape two pieces together with two-sided tape.
Drill 3/8" diameter holes half way through both pieces using
a forster bit.
Separate pieces and remove any adhesive remaining.
Round all edges with either a file and sandpaper or a 1/4"
roundover bit in a router table. If you are using a router, round
the grain edges first, then round the edges with the grain.
III. Sanding,
Staining and Finishing
Sand, starting
at 120 grit and working up to 150 grit sandpaper. (Start at 80
grit if wood is very rough.) Remove all evidence of sanding dust.
Sand dowel rods to 150 grit.
Pre-treat softwoods with Minwax® Pre-Stain Wood Conditioner.
Apply stain and finish:
Oil-based: Apply Minwax® Wood Finish™ per label directions.
Wait eight hours before applying your first coat of Minwax®
Fast-Drying Polyurethane; or
Water-based: Apply Minwax Accents®, per label instructions.
Wait 4-6 hours before applying your first coat of Minwax®
Polycrylic® Protective Finish.
IV. Assembly
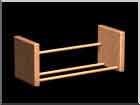
Insert dowel
rods, separate ends to snugly hold compact discs or tapes, and
enjoy your handiwork!
V. Cleanup
If you have
product left over, wipe the can rim so that product in the rim
doesn't dry out and cause lid not to form a tight seal. After
sealing, store cans away from heat.
Clean brushes used for oil-based finishes with mineral spirits;
soap and water are all that is needed for brushes used for water
cleanup products.
VI. Safe
Disposal of Rags & Waste
Please be mindful
of the safe way to dispose of used rags and other waste. Rags, steel
wool and other waste soaked with oil finishes may spontaneously
catch fire if improperly discarded. Place rags, steel wool and waste
immediately after use in a water-filled metal container. Tightly
seal and then dispose of in accordance with local regulations. Be
sure to keep the container out of reach of children.
plans
courtesy of: WoodWorkersWorkShop.com
|