| SPECIAL OFFER |
|
Free
Woodworking Magazine!
Now celebrating
its 25th anniversary, Woodworker's Journal offers projects, tips,
tool reviews and techniques for woodworkers of all skill levels!
Sign
up for your FREE issue of Woodworker's Journal and get "250
Best Shop Tricks" book as our free gift to you!
Click
Here Now!
|
|
 |
 |
|
FREE
WOODWORKING PLANS
Browse
All Woodworking Plans at Rockler
Garden Bench
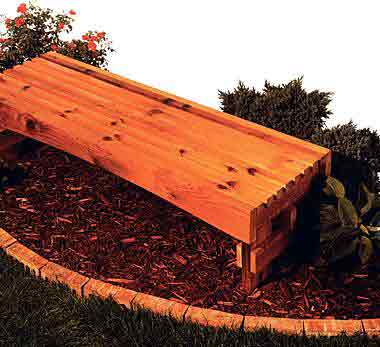
In much the
same way paths suggest that you wander, benches invite you to linger,
to contemplate, to savor. For people who usually view their gardens
from their knees or who mainly see them as works in progress, benches
offer a different perspective, a change of view and attitude. Benches
remind gardeners to relax and enjoy the beauty they are helping
to create. In The Principles of Gardening Hugh Johnson says that
garden benches should always look permanent; deliberately placed.
One way to achieve that look is to start with a simple design such
as this cedar bench. it has the sort of solid simplicity that suggests
permanence. And the color of the cedar blends effortlessly into
surrounding trees, flowers, and foliage, adding to the impression
that the bench is and always will be an essential part of the garden.
Placing a bench
deliberately is important, but not complicated. Walk around the
garden and think about where you stop to rest, to enjoy a special
view, or to appreciate pleasant fragrances. Take note of where visitors
pause, and consider what draws them to those spots. A bench can
provide a place for the eyes to rest, as well as the body. As you
wander, imagine how you might use a bench to draw the eye down a
path or into a quiet corner.
With its subtle
design, this easy-to-build bench lends itself to being used in combination
with other ornaments or furnishings. Flank the ends with cedar planter
boxes or a copper trellis to create a lovely focal point at the
edge of a bed or border.
|
|
|
| Everything
You Need: |
| Tools:
1 1/2" deck screws, Circular saw, Drill, Tape measure,
Hammer, Long metal ruler, Jig saw, Finishing sander, 2 1/2"
deck screws, wood glue, Casing nails (3), Wood sealer/stain,
1 × 4 × 12' cedar (1), 2 × 2 × 6' cedar
(1), 2 × 2 × 10' cedar (4), 2 × 4 ×
6' cedar (1), 2 × 6 × 10'cedar (1), 2 × 8
× 6' cedar (1). |
|
|
|
|
CUTTING
LIST
|
|
Key
|
Part
|
Dimension
|
Pcs |
Material |
Key
|
Part |
Dimension |
Pcs |
Material |
|
A
|
Leg
half |
1
1/2 × 7 1/4 × 14 1/2" |
4
|
Cedar
|
D
|
Trestle |
11/2
× 31/2 × 60" |
1
|
Cedar
|
|
B
|
Cleat |
3/4
× 3 1/2 × 16 " |
8
|
Cedar
|
E
|
Apron |
11/2
× 51/2 × 60" |
2
|
Cedar
|
|
C
|
Brace |
1
1/2 × 1 1/2 × 16" |
3
|
Cedar
|
F
|
Slat |
1112
× 11/2 × 60" |
8
|
Cedar
|
|
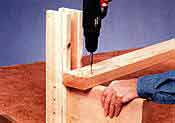
Step A: Begin the Leg Assemblies & Attach the Trestle
1. Cut the
leg halves (A), cleats (B), and trestle (D) to length. Sandwich
one leg half between two cleats so the cleats are flush with the
top and the outside edge of the leg half. Then join the parts
by driving four 1 1/2" deck screws through each cleat and
into the leg half. Assemble two more cleats with a leg half in
the same fashion.
2. Stand the
two assemblies on their sides, with the open ends of the cleat
pointing upward. Arrange the assemblies so they are roughly 4
ft. apart. Set the trestle onto the inner edges of the leg halves,
pressed flush against the bottoms of the cleats.
Adjust the
position of the assemblies so the trestle overhangs the leg half
by 1 1/2" at each end. Fasten the trestle to each leg half
with glue and 2 1/2" deck screws.
3. Attach
another pair of cleats to each leg half directly below the first
pair, positioned so each cleat is snug against the bottom of the
trestle.
|
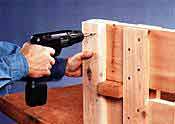 Step B: Complete the Leg Assemblies
Slide the
other leg half between the cleats, keeping the top edge flush
with the upper cleats. Join the leg halves with the cleats,
using glue and 2 1/2" deck screws.
|
Step C: Add the Braces
Cut the braces
(C) to length. Fasten one brace to the inner top cleat on each
leg assembly so the tops are flush.
|
 Step D: Shape the Aprons
1.Cut the
aprons (E) to length.
2. Lay out
the arch onto one apron, starting 3" from each end. The
peak of the arch, located over the midpoint of the apron, should
be 1 1/2" up from the bottom edge.
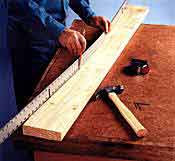
3. Draw
a smooth, even arch by driving one casing nail at the peak of
the arch and one at each of the starting points. Slip a long
metal ruler behind the nails at the starting points and in front
of the nail at the peak to create a smooth arch. Then trace
along the inside of the ruler to mark a cutting line.
4. Cut along
the line with a jig saw; then sand the cut smooth.
5. Trace
the profile of the arch onto the other apron; make and sand
the cut.
|
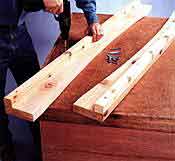
Step E: Add Slats to the Aprons
Cut the slats
(F) to length. Attach a slat to the top, inside edge of each apron,
using glue and deck screws.
|
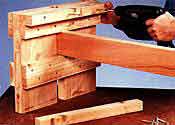
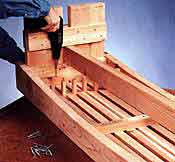 Step F: Install the Aprons & Slats
1. Apply glue
at each end, on the bottom sides, of the attached slats. Flip
the leg and trestle assembly, and position it flush with the aprons
so that it rests on the glue on the bottoms of the two slats.
The aprons should extend 1 1/2" beyond the legs at each end
of the bench. Drive 2 1/2" deck screws through the braces
and into both slats.
2. Position
the middle brace between aprons, centered end to end. Attach it
to the two side slats with glue and deck screws.
3. Position
the six remaining slats on the braces, using 1/2"-thick spacers
to help you create equal gaps between them. Attach the slats with
glue and drive 2 1/2" deck screws up through the braces and
into each slat.
4. Sand the
slats smooth with progressively finer sandpaper. Wipe away the
sanding residue with a rag dipped in mineral spirits. Let the
bench dry. Apply a finish of your choice -- a clear wood sealer
to protect the cedar without altering the color, or stain to provide
deeper color for the cedar.
|
TIP: LEVELING LEGS
Sometimes our best
efforts produce furniture that wobbles because it's not quite level. Here's
a trick for leveling furniture:
Set a plastic wading
pool on a flat plywood surface. Add shims under the plywood surface until
the floor of the wading pool is exactly level.
Fill the pool with
about 1/4" of water. Set the piece of furniture in the pool, and
then remove it quickly. Mark the top of the waterline on each leg. Use
these marks as cutting lines to trim the legs to exactly level.
TIP: COUNTERSINKING SCREWS
Take extra care to
completely countersink screw heads whenever you are building furnishings
that will be used as seating. When sinking galvanized deck screws, use
a combination countersink/piloting bit that drills a 3/32"-dia. pilot
hole.
plans
courtesy of: WoodWorkersWorkShop.com
|

