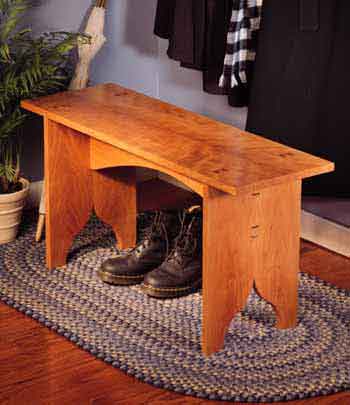
Four boards and a little space along a wall is all you need
for this bench.
With nothing more than wedged tenons and some good engineering,
this is a phenomenally strong bench. The wedged tenons create
a splayed dovetail effect that completely locks this bench
together. I built this bench using only The Little Shop Mark
II, a workshop on wheels that uses only $1,000 in tools.
Begin
construction by cutting out the four boards according to the
Schedule of Materials. The extra length on the stretcher and
legs is to accommodate a little extra length on the tenons
for trimming.
After
cutting and cleaning up the tenons, lay out and cut the through-mortises,
which are angled to accommodate the wedged tenons. Cut the
mortises to fit right over the tenons. To lay out the arc
on the stretcher, drive a nail into the top of the arc at
the center of the board. Then drive a nail into the starting
point of both ends of the arc, as close to the edge of the
board as possible. Take a strip of wood approximately 1/8"
x ½" x 36" and bend it into an arc between
the nails and trace a line on the stretcher. Remove the nails,
cut out the arc and clean up the edge with a drawknife.
Now make
the cutouts in the end panels. Lay them out according to the
diagram, then cut them out with a coping saw. Make some relief
cuts into the waste side to make cutting it out a little easier.
Once you
have all the joinery fit, it’s time to get ready to assemble
the bench. This is a completely clamp-free glue up. The wedges
driven into the tenons act as the “clamps” to hold
the entire bench together. The wedges are cut at an angle
wider than the 5? of the mortise because the wedge itself
becomes compressed when driving into the tenon. This compression
takes away some of the wedges’ ability to spread the
tenon. That’s why you make wedges with a 7? taper. This
yields a good spread on the tenon during assembly.
Now is
the time to test a set of wedges in a joint. Using no glue,
assemble a joint. Tap in a couple of wedges and see if they
completely spread a joint apart before bottoming out in the
tenon slot. If they leave a little room, cut a little off
of the wedge’s narrow end and taper it to fit the top
of the slot accordingly. This gives a little more play to
spread the tenon apart. Gently disassemble the dry-fit joint
and proceed to glue up the bench and drive home the wedges
with glue on them. It helps to wait a bit to clean up the
squeezed-out glue. This lets it get a “skin” that
keeps the mess to a minimum. Clean up with a chisel and a
damp rag.
After
cutting the tenon a little proud, mask off the tenon for sanding
by taping around the entire tenon with two widths of masking
tape. The tape keeps you from sanding a depression in the
top around the tenon. Chisel and plane an angle on all four
sides of the tenons and round them over with a sander. Remove
the tape and sand the rest of the bench to 150 grit. Apply
three coats of clear finish and rub out your finish with some
steel wool and wool wax, a lubricant you can find at many
woodworking stores.
|

 Glue
up Your Panels Taking some lumber from a friend’s cherry
tree, cut down, milled and air dried. I glued up two boards
to make the top and ends for this bench. Some scraping of
the joint is required after gluing. Try to arrange your
boards so the joint between them is invisible. Glue
up Your Panels Taking some lumber from a friend’s cherry
tree, cut down, milled and air dried. I glued up two boards
to make the top and ends for this bench. Some scraping of
the joint is required after gluing. Try to arrange your
boards so the joint between them is invisible.
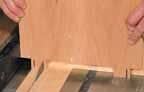
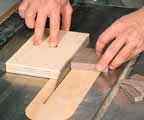
 Cutting
Tenons Cut the tenons to the actual width on the table saw.
Set the blade to 1" high, defining the length of the
tenons. After marking the depth with a gauge, cut the waste
out from between the tenons. Set the saw to 7/8" high
for cutting the slots that accept the wedges used to hold
the table together. See the diagram for the actual size
of the outer parts of the tenon. Use a backing board on
your miter gauge to hold the boards upright. Cutting
Tenons Cut the tenons to the actual width on the table saw.
Set the blade to 1" high, defining the length of the
tenons. After marking the depth with a gauge, cut the waste
out from between the tenons. Set the saw to 7/8" high
for cutting the slots that accept the wedges used to hold
the table together. See the diagram for the actual size
of the outer parts of the tenon. Use a backing board on
your miter gauge to hold the boards upright.
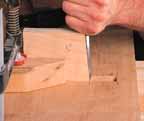
 Routing
a Shoulder Next, set up the router table with a ¼"
straight bit to clean up the shoulders of the tenons. Mark
on the router table fence where you need to stop and start
each cut and gently push the tenon ends of the boards against
the bit, missing the tenon. Routing
a Shoulder Next, set up the router table with a ¼"
straight bit to clean up the shoulders of the tenons. Mark
on the router table fence where you need to stop and start
each cut and gently push the tenon ends of the boards against
the bit, missing the tenon.
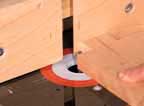
 Tapered
Mortises When you can press fit everything together, make
a simple angle gauge to cut the 5? angle on the narrow widths
of the mortises. The 5? angle widens the top of the mortise
by about 1/8". Split this measurement and mark both
sides of the mortise, with a 1/16" offset, for setting
the angle gauge. Before chiseling the angle, take a small
saw and cut the sides of the mortises to the marks, reducing
tearout. Clamp the gauge in place and gently chisel out
the angle on the mortise sides. The angle shouldn’t
go completely to the other side of the mortise. This leaves
a softer bend for the tenon to make (see diagram), thereby
reducing cracking — something you have to be careful
about in a brittle wood such as cherry. Tapered
Mortises When you can press fit everything together, make
a simple angle gauge to cut the 5? angle on the narrow widths
of the mortises. The 5? angle widens the top of the mortise
by about 1/8". Split this measurement and mark both
sides of the mortise, with a 1/16" offset, for setting
the angle gauge. Before chiseling the angle, take a small
saw and cut the sides of the mortises to the marks, reducing
tearout. Clamp the gauge in place and gently chisel out
the angle on the mortise sides. The angle shouldn’t
go completely to the other side of the mortise. This leaves
a softer bend for the tenon to make (see diagram), thereby
reducing cracking — something you have to be careful
about in a brittle wood such as cherry.
 Wedges
The wedges are cut on the table saw using a simple jig (see
diagram below). The stock is ¾" x 6" x
3". That means the grain direction is in the 3"
dimension. Make a simple jig to hold the wedge stock while
cutting on the saw. Wedges
The wedges are cut on the table saw using a simple jig (see
diagram below). The stock is ¾" x 6" x
3". That means the grain direction is in the 3"
dimension. Make a simple jig to hold the wedge stock while
cutting on the saw.
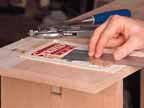
 Trimming
Tenons When the glue is dry and cleaned up, make a template
out of the cover from a steno pad. The front and back will
do. Just tape them together and cut out a couple of holes
for the tenons to come through. The more difficult set of
tenons to reach are the ones below the top. Set your template
up for those. Lay the template over the tenons and cut them
flush with the template. Trimming
Tenons When the glue is dry and cleaned up, make a template
out of the cover from a steno pad. The front and back will
do. Just tape them together and cut out a couple of holes
for the tenons to come through. The more difficult set of
tenons to reach are the ones below the top. Set your template
up for those. Lay the template over the tenons and cut them
flush with the template.
|