| SPECIAL OFFER |
|
Free
Woodworking Magazine!
Now celebrating
its 25th anniversary, Woodworker's Journal offers projects, tips,
tool reviews and techniques for woodworkers of all skill levels!
Sign
up for your FREE issue of Woodworker's Journal and get "250
Best Shop Tricks" book as our free gift to you!
Click
Here Now!
|
|
 |
|
FREE
WOODWORKING PLANS
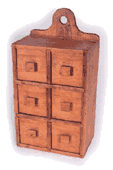 Spice
Cabinet Spice
Cabinet
Though members
of your family aren't likely to store spices in a cabinet like this,
you can bet that it will be an oft-requested item for you to build.
So you might want to think about making more than one when you begin.
Scroll
Down for This Plan
or
Browse All Woodworking Plans at Rockler
|
|
|
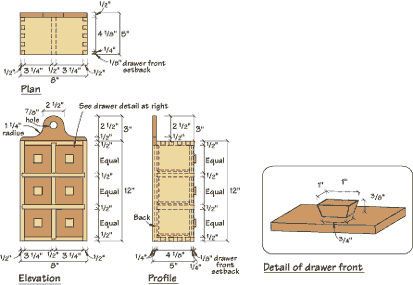
 Cut
the sides and ends to size, then cut 1/2" finger joints on the
ends of each piece. Cut
the sides and ends to size, then cut 1/2" finger joints on the
ends of each piece. |
 Next
cut 1/4" x 1/2"—wide dadoes on the sides and ends as
located on the diagrams (below). Also cut a 1/4" x 1/2—wide
rabbet on the back edge of each side for the back. Next
cut 1/4" x 1/2"—wide dadoes on the sides and ends as
located on the diagrams (below). Also cut a 1/4" x 1/2—wide
rabbet on the back edge of each side for the back. |
 Next,
cut the three dividers to size, and with the case dryclamped together,
check the dimentions of the diveders against your case. Trim them
to fit, then cut 1/2"—wide bridle joints to fit the dividers
together. Glue up the case, holding the dividers' front edges flush
to the case front. When dry, sand the joints flush to the outside
surfaces. Next,
cut the three dividers to size, and with the case dryclamped together,
check the dimentions of the diveders against your case. Trim them
to fit, then cut 1/2"—wide bridle joints to fit the dividers
together. Glue up the case, holding the dividers' front edges flush
to the case front. When dry, sand the joints flush to the outside
surfaces. |
 Cut
the hanger to shape from the diagrams, then glue and nail the hanger
in place at the back of the cabinet. Now cut the back to size and
nail it in place. Cut
the hanger to shape from the diagrams, then glue and nail the hanger
in place at the back of the cabinet. Now cut the back to size and
nail it in place. |
 Next
cut the drawer box pieces to size. Then cut 1/8" x 1/4"-deep
dadoes for the bottoms on the ends and sides, starting 1/8" up
from the bottom edge. To assemble, glue and nail the drawer boxes
together. Next
cut the drawer box pieces to size. Then cut 1/8" x 1/4"-deep
dadoes for the bottoms on the ends and sides, starting 1/8" up
from the bottom edge. To assemble, glue and nail the drawer boxes
together. |
 Cut
the drawer fronts to size, then make the knobs. Cut a 3/8" x
1" x 8" strip of cherry, beveling the sides at a 25—degree
angle. Then cut the knobs off at 1" intervals, again beveling
the sides at 25 degrees. Use either a band saw to cut the knobs to
shape, or sand them to shape after separating. Attach the knobs to
the drawer fronts with #4 flathead screws and glue. Then glue the
fronts to the drawer boxes. Cut
the drawer fronts to size, then make the knobs. Cut a 3/8" x
1" x 8" strip of cherry, beveling the sides at a 25—degree
angle. Then cut the knobs off at 1" intervals, again beveling
the sides at 25 degrees. Use either a band saw to cut the knobs to
shape, or sand them to shape after separating. Attach the knobs to
the drawer fronts with #4 flathead screws and glue. Then glue the
fronts to the drawer boxes. |
 Before
finishing the piece, distress the cabinet with keys, screwdrivers
and a hammer. I then applied brown mahogany gel stain; when the stain
was dry, then applied a coat of wax. Before
finishing the piece, distress the cabinet with keys, screwdrivers
and a hammer. I then applied brown mahogany gel stain; when the stain
was dry, then applied a coat of wax. |
| No. |
Item |
Dimensions
(T W L) |
Material |
|
2
|
Sides
|
1/2"
x 5 " x 12"
|
Cherry
|
|
1
|
Bottom
|
1/2"
x 5" x 8"
|
Cherry
|
|
1
|
Top
|
1/2"
x 4 9/16" x 8 "
|
Cherry
|
|
1
|
Center
|
1/2"
x 4 1/2" x 11 1/2"
|
Cherry
|
|
2
|
Dividers
|
1/2"
x 4 1/2" x 7 7/2"
|
Cherry
|
|
1
|
Hanger
|
1/2"
x 8 " x 3 1/2"
|
Cherry
|
|
1
|
Back
|
1/4"
x 7 1/2" x 11 "
|
Plywood
|
|
6
|
Drwr
fronts
|
1/4"
x 3 1/4" x 3 5/16"
|
Cherry
|
|
12
|
Drwr
sides
|
1/4"
x 3 3/16" x 4 1/8"
|
Plywood
|
|
12
|
Drwr
ends
|
1/4"
x 3 3/16" x 3 "
|
Plywood
|
|
6
|
Drwr
bottoms
|
1/4"
x 2 15/16" x 3 7/8"
|
Plywood
|
|
6
|
|
3/8"
x 1 " x 1 "
|
Cherry
|
plans
courtesy of: WoodWorkersWorkShop.com
|