|
Construction
I used three 8ft boards which I had planed to size [6in (152mm)
wide and 1in (25mm) thick] by my local supplier. I then checked
each one carefully to ensure that the edges were square - where
necessary, they were adjusted with a plane. Once jointed the three
boards will be just over the necessary width of 17in.
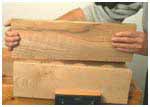
Once this initial
dimensioning has been done, lay out the three planks to work out
the best arrangement, ensuring that the good faces are on the outside.
It looks good if you cut the top and sides from continuous lengths
so that the same grain pattern runs across the top and down each
side. When you've decided the positioning of each board (ensuring
that each plank has the growth rings on the end grain placed alternately
up and down to avoid warping), cut each one into four pieces (i.e.
top, 2 sides, shelf) slightly longer than required. Clearly identify
which pieces are to be joined together, then mark on the jointing
edges of each the position of the centre point of the biscuits,
about 4in (100mm) apart.
Biscuit Joints
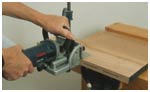 I
chose to use biscuits because when cut with a biscuit jointer they're
one of the quickest and most accurate ways of edge jointing planks. I
chose to use biscuits because when cut with a biscuit jointer they're
one of the quickest and most accurate ways of edge jointing planks.
 When
the grooves have been cut, apply glue to the joints, place the biscuits
into the slots and clamp the planks together. When
the grooves have been cut, apply glue to the joints, place the biscuits
into the slots and clamp the planks together.
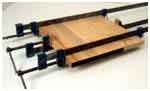 The
clamps are positioned alternatively under and over the workpiece
to minimize distorting the wood when pressure is applied. The
clamps are positioned alternatively under and over the workpiece
to minimize distorting the wood when pressure is applied.
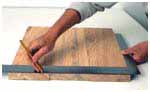 When
the glue has dried, remove the clamps and use a large square to
mark the edges before trimming them with a saw. When
the glue has dried, remove the clamps and use a large square to
mark the edges before trimming them with a saw.
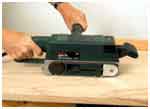 At
this stage, remove any glue and blemishes on the faces of the boards
with a belt sander. At
this stage, remove any glue and blemishes on the faces of the boards
with a belt sander.
Edge Profile
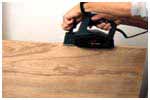 There
are a number of ways to shape the quadrant moulding on the edges
of the top and sides, but I opted to work the curved profile using
a powered plane and abrasive paper. There
are a number of ways to shape the quadrant moulding on the edges
of the top and sides, but I opted to work the curved profile using
a powered plane and abrasive paper.
Mark the profile
of the quadrant on the ends of the edges of each piece, then use
a plane to take off the corners as close to the line as possible.
Finally, use abrasive paper on a shaped block to complete the rounding
process.
Alternatively,
make a template for the shape from a piece of thick card hold it
against the shape as work proceeds along the length of the board
until the profile is reached.
Mitre Joints
The top is mitred to the sides to create a clean uninterrupted transition
from horizontal to vertical, and are biscuit jointed to aid location
and increase the strength of the joint. Cut the mitres with a mitre
saw and use the biscuit jointer to make the grooves for the biscuits.
Note that the biscuits are not positioned in the centre of the mitre
are cut closer to the inside edge of the joint so that the cutter
can cut to the full depth for the biscuit without the risk of breaking
through to the outside surface.
Take the shelf component and reduce the width by couple of inches
by sawing a piece off one edge and smoothing with a plane. Long,
stub tenons are cut at each end of the shelf and housed into mortices
in the sides.
Cutting List
| Item |
Quantity |
Length
(in) |
Width
(in) |
Thickness
(in) |
| Top |
1 |
30 |
17 |
1 |
| Sides |
2 |
17 |
17 |
1 |
| Shelf |
1 |
28 3/4 |
15 |
1 |
plans
courtesy of: WoodWorkersWorkShop.com
|


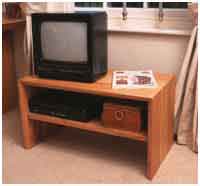 This
versatile table is made from European ash, an open-textured timber
with a straight grain and a colour ranging from pale cream to pale
brown. However, I managed to find some with a darker stain running
through parts of the grain and also with some areas of wild grain,
both of which I think add visual interest. When you're working with
solid timber, it's important to consider the natural qualities in
the material and how they'll relate to the overall design. In this
case, an uncomplicated design is offset by the inherent qualities
of the timber.
This
versatile table is made from European ash, an open-textured timber
with a straight grain and a colour ranging from pale cream to pale
brown. However, I managed to find some with a darker stain running
through parts of the grain and also with some areas of wild grain,
both of which I think add visual interest. When you're working with
solid timber, it's important to consider the natural qualities in
the material and how they'll relate to the overall design. In this
case, an uncomplicated design is offset by the inherent qualities
of the timber.